


How to Automate Lead Follow-Ups in GoHighLevel (Step-by-Step)

 May 19,2026
  By azeemak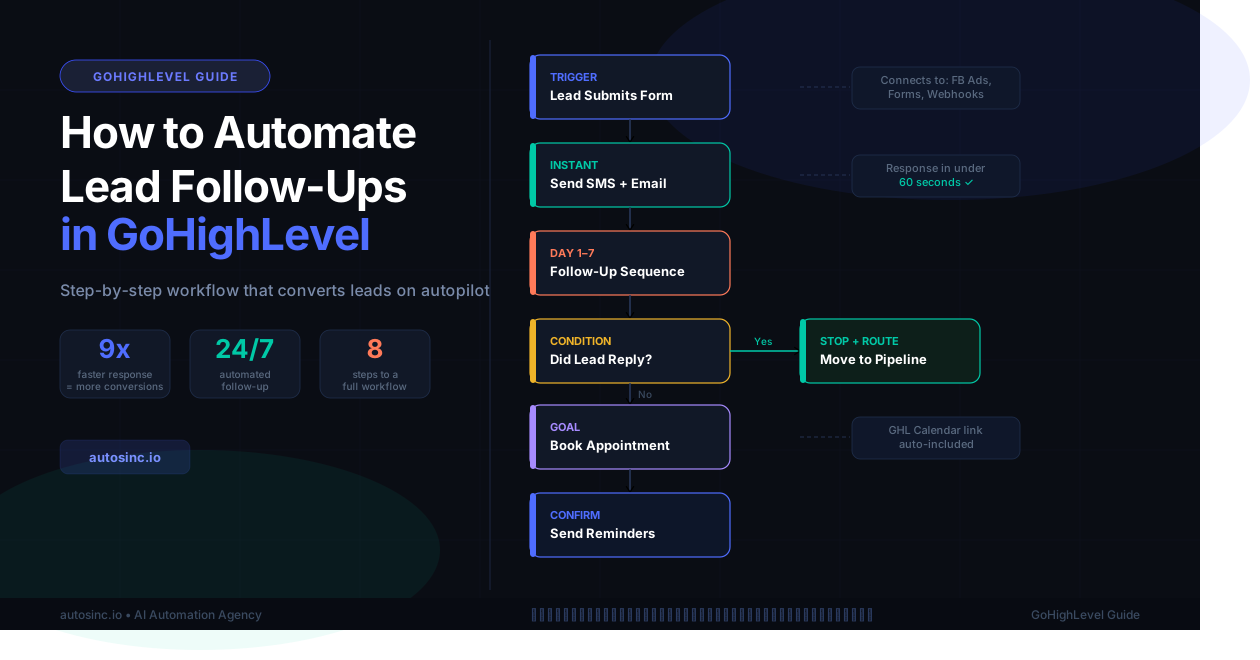
Introduction
Most agencies lose leads not because of a bad offer — but because of slow follow-up.
Research shows that contacting a lead within the first 5 minutes increases conversion chances by 9x compared to following up an hour later. But manually chasing every lead the moment they come in? That’s impossible at scale.
That’s exactly where GoHighLevel automation saves you. In this guide, you’ll learn step-by-step how to build a lead follow-up automation inside GoHighLevel that works 24/7, responds instantly, and nurtures every lead until they’re ready to buy — without you lifting a finger.
Why Manual Follow-Up Is Killing Your Conversions
Before we dive into the setup, let’s be real about what’s happening when you follow up manually:
- Leads come in at odd hours — nights, weekends, holidays
- Your team gets busy and follow-ups happen hours or days later
- Inconsistent messaging confuses leads and damages trust
- You have no visibility into who was contacted and when
GoHighLevel solves every one of these problems through automated workflows — a set of triggers, conditions, and actions that run on their own the moment a lead enters your system.
What You’ll Need Before You Start
- An active GoHighLevel account (any plan)
- At least one lead source connected (form, landing page, Facebook Ads, etc.)
- A verified phone number and email domain inside GHL
- Basic familiarity with the GHL dashboard
If you’re brand new to GoHighLevel, don’t worry — this guide walks you through each step clearly.
Step 1: Set Up Your Lead Pipeline
Before building automation, you need a pipeline that tracks where each lead is in your process.
How to do it:
- Go to CRM → Pipelines in your GHL sidebar
- Click Add Pipeline and name it (e.g., “Inbound Leads”)
- Add stages that match your sales process:
- New Lead
- Contacted
- Qualified
- Proposal Sent
- Closed Won / Closed Lost
Why this matters: Your automation will move leads through these stages automatically based on their behavior. This gives you full visibility without manual data entry.
Step 2: Create Your Lead Capture Trigger
The automation needs a starting point — the moment a new lead enters your system.
How to do it:
- Navigate to Automation → Workflows
- Click Create Workflow → Start from Scratch
- Add a Trigger — choose from:
- Form Submitted (for website forms)
- Facebook Lead Ad Submitted (for FB/Instagram ads)
- Inbound Webhook (for third-party tools)
- Contact Tag Added (for manual or bulk imports)
- Configure the trigger to match your specific form or ad account
- Click Save Trigger
Pro tip: Create a separate workflow for each lead source. This lets you customize the messaging based on where the lead came from — a Facebook ad lead needs different messaging than a website contact form submission.
Step 3: Send an Instant First Response (Within 60 Seconds)
This is the most important step. Speed-to-lead is everything.
How to do it:
- After your trigger, add an Action
- Choose Send SMS or Send Email (or both — recommended)
- Write your instant response message. Here’s a template you can customize:
SMS Template: “Hey [First Name]! Thanks for reaching out to [Your Agency Name]. We just got your message and someone from our team will be in touch within the next few minutes. In the meantime, feel free to reply with any questions!”
Email Template: Subject: “We received your inquiry, [First Name]!” Body: “Hi [First Name], thanks for your interest in [Your Agency Name]. We’ve received your details and our team will reach out to you shortly. We’re excited to learn more about your business goals.”
- Use custom values (like
{{contact.first_name}}) to personalize every message automatically
Why this works: This immediate response sets expectations, builds trust, and keeps your lead warm while your team prepares to call.
Step 4: Add a Time Delay + Follow-Up Sequence
One message is never enough. Build a multi-touch follow-up sequence across several days.
Recommended sequence:
| Day | Action | Message Type |
|---|---|---|
| Day 0 | Instant response | SMS + Email |
| Day 1 | Check-in | SMS |
| Day 2 | Value-add | Email (case study, guide, or tip) |
| Day 4 | Soft push | SMS (“Did you get a chance to review…”) |
| Day 7 | Last attempt | Email + SMS |
| Day 14 | Long-term nurture | Email only |
How to build it in GHL:
- After your instant message, add a Wait action (set to 1 day)
- Add the next Send SMS or Send Email action
- Repeat the pattern — Wait → Message → Wait → Message
- Continue until your sequence is complete
Pro tip: Keep SMS messages short (under 160 characters). Use email for longer, value-driven content.
Step 5: Add Conditions to Stop Follow-Up When a Lead Responds
Nothing kills trust faster than sending follow-up messages to someone who already replied. You need to automatically stop the sequence the moment a lead engages.
How to do it:
- At the beginning of your workflow (after the trigger), add an If/Else condition
- Set the condition: “Has replied to SMS” or “Has opened/replied to email”
- If Yes → Remove from workflow OR move to a “Responded” pipeline stage
- If No → Continue with the follow-up sequence
Alternatively, use workflow goals:
- Click Add Goal at the top of your workflow
- Set goal: Contact Replied or Appointment Booked
- GHL will automatically end the workflow when the goal is reached
This ensures your automation feels human — not like a spambot.
Step 6: Trigger an Appointment Booking Flow
The ultimate goal of follow-up is to get a call booked. Automate that too.
How to do it:
- Include a calendar link in your Day 2 or Day 4 message
- Use GHL’s built-in Calendars feature to create a booking page
- Set a trigger in your workflow: Appointment Booked
- Add a confirmation SMS + email that fires instantly when they book
- Add reminder messages 24 hours and 1 hour before the call
Confirmation SMS example:
“You’re all set, [First Name]! Your call with [Your Name] is confirmed for [Date] at [Time]. We’ll send you a reminder closer to the time. See you then!”
Step 7: Test Your Entire Workflow
Before going live, test everything thoroughly.
Testing checklist:
- Submit a test lead through your actual form/ad
- Verify the instant SMS and email arrive within 60 seconds
- Check that personalization fields populate correctly
- Wait 24 hours and confirm Day 1 follow-up fires
- Reply to the SMS and confirm the sequence stops
- Book a test appointment and verify confirmation messages arrive
- Check the pipeline — confirm the lead moved to the correct stage
Fix any issues before sending your first real lead through.
Step 8: Monitor and Optimize Performance
Set these up once and review weekly:
Key metrics to track in GHL:
- Open rate (email) — aim for 40%+
- Reply rate (SMS) — aim for 15%+
- Appointment booking rate — aim for 10-20% of all leads
- Speed to first contact — should be under 2 minutes
Go to Reporting → Email Stats / SMS Stats to see how each message in your sequence performs. If a specific day’s message has a low response rate, rewrite it and test a new version.
Common Mistakes to Avoid
1. Sending too many messages too quickly Bombarding leads in the first 24 hours feels aggressive. Space your messages out — 1-2 per day maximum in the early stages.
2. Using generic, robotic language Every message should sound like it was written by a real person. Use first names, keep the tone conversational, and avoid corporate-speak.
3. Never stopping the sequence If someone replies “not interested,” your automation should tag them and exit them from the workflow immediately. Set up a trigger for this.
4. Ignoring mobile optimization Most people read SMS and emails on their phone. Keep emails short, use short paragraphs, and make sure your calendar booking page works perfectly on mobile.
5. Not testing before going live Always test with a real submission before sending leads through. One broken workflow can mean losing dozens of leads.
The Result: What This Automation Achieves
Once this workflow is live, here’s what happens automatically every single day:
- Every new lead gets a response within 60 seconds — even at 2am
- Each lead receives a perfectly timed multi-day follow-up sequence
- Leads who respond get moved to the right pipeline stage instantly
- Appointments get booked, confirmed, and reminded automatically
- Your team only spends time on leads that are ready to talk
This is the difference between an agency that scales and one that stays stuck doing everything manually.
Ready to Set This Up for Your Agency?
If you’d rather have this built for you — properly configured, tested, and optimized for your specific lead flow — that’s exactly what we do at Autosinc.
We build custom GoHighLevel automation systems that help agencies respond faster, convert more leads, and run smoother operations without the manual work.
Get Your Free Automation Audit →
No commitment. We’ll review your current setup and show you exactly what can be automated and improved.